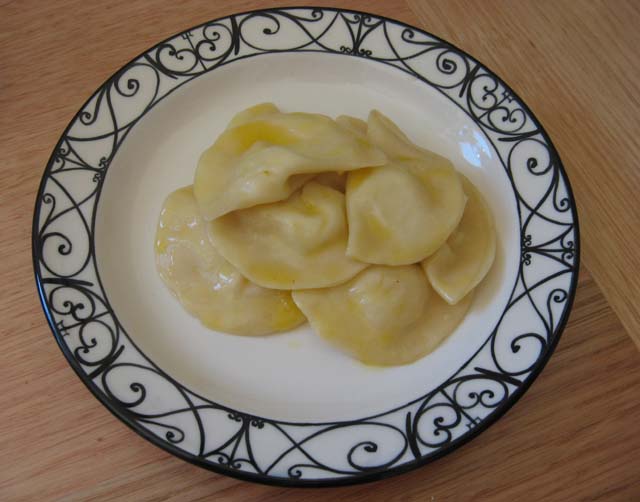
Pyrohy
Every year my family celebrates Christmas twice, on the 25th like most folk and then again about two weeks later to mark my Ukrainian Dad’s Christmas (which is later as the Orthodox church follows the Julian calendar which is somewhat out of sync with the Gregorian calendar used in the west.)
The second Christmas meal is usually a lot simpler; this year we held it at my house (yay for having a new kitchen!). I cooked a pair of roast chooks, the usual veg, and decided for a change to add a Ukrainian component. Now I should point out here that my beloved dad learnt to cook in Australia, so I didn’t grow up with any Ukrainian food traditions. I do however have two rather nice Ukrainian cookbooks (Traditional Ukrainian Cookery by Savella Stechishin and Festive Ukrainian Cooking by Marta Pisetska Farley) from which I have obtained this recipe.
Pyrohy are the Ukrainian equivalent of ravioli, also known as varenyky in the eastern parts of Ukraine and pierogi in Poland. I’d made them before in my pre-motherhood days, and hadn’t considered cooking them again as just like good ravioli, the dough contains egg. However while reading the Stechishin book a little closer I noticed there was an option for an egg-free dough, using evapourated milk. To my surprise it worked a dream. I can now see no reason not to use the same recipe for egg-free home-made pasta.
Pyrohy dough:
2 ½ cups flour
½ tsp salt
1-2 tbs butter, melted
½ to 1 cup evaporated milk
¼ cup of water as needed
Place flour and salt in a bowl, forming a well in the middle, add evapourated milk and enough water to form a medium soft dough. Knead until dough sticks together, allow to rest for a few minutes, then knead until smooth. Rest, covered, for at least 30 minutes. (It may be wrapped in plastic and refrigerated for a day or so, bring to room temperature before rolling out).
At this point you can either roll the dough out by hand to 1/8th inch thickness or do like I did and use a pasta machine which is much easier. The dough is then cut into circles with whatever you have at hand. 3 to 4 inches wide are suggested in my books, I used a 2 inch scone cutter; just remember the smaller they are, the more work you have on your hands (because you end up making a lot more). They can also be cut into squares which would be much quicker, but less cute.
Then about a teaspoon of filling (or a tablespoon if you are making 4 inch circles) is placed on each circle and they are folded in half and sealed by squeezing the edges with your fingers. A dab of water around the edges before you fold can make the edges adhere better if the dough is on the dry side. Try not to get any filling on the edges as it will then leak when you cook it. Place filled pyrohy on a teatowel, floured board or non-stick tray, and be careful that they don’t stick together.
Bring a large pot of water to a vigorous boil, add as many as you can without them sticking together (with my stockpot and this recipe I managed to cook them in 4 batches). Boil for 3-4 minutes. Remove with a slotted spoon or sieve and drain thoroughly. Place in a deep dish and coat evenly with melted butter to prevent them sticking. Cover and keep hot until all are cooked.
They can be served just with butter, with sour cream, topped with browned buttered bread crumbs, and/or chopped crisped bacon. If you are lucky enough to have leftovers they can be reheated by steaming them, or fried in yet more butter until golden.
Potato filling:
2 tbs onion, grated or very finely chopped
2 tbs butter
2 cups cold mashed potato
1 cup of cottage cheese (or more if you prefer)
Mix and add salt and pepper to taste. One of my books says to sieve the cottage cheese, I think life is too short and am not concerned with the cottage cheese being visible in the filling.
They can also be filled with cheese, cabbage, mushroom, ham, or made as a desert with a sweet plum filling.
posted by din at 9:59 pm
0 comments
![]()